how to stitch embroidery patches Chenille & chainstitch letter patches handmade custom in 2020
Embroidery has always been a popular craft, and it continues to capture the imagination of creative individuals worldwide. There’s something so satisfying about turning a plain piece of fabric into a work of art with just needle and thread. And now, with the rise of DIY culture, you can take your hand-stitched embroidery to the next level by turning it into a patch!
Why Turn Hand-Stitched Embroidery into a Patch?
The beauty of embroidered patches lies in their versatility. Not only can they be used to adorn clothing items like jackets, jeans, or bags, but they also make fantastic decorative elements for accessories like hats or backpacks. By transforming your embroidery into patches, you can give your creations new life and share them with the world.
But how exactly can you turn your beautiful hand-stitched designs into patches? Let me walk you through the process:
Step 1: Gather Your Materials
To create your embroidered patches, you’ll need a few essential materials:
- Fabric for your patches
- An embroidery hoop
- Embroidery thread in various colors
- A needle
- Scissors
- An iron-on adhesive
- An iron
Once you have everything you need, you’re ready to start transforming your embroidery into patches!
Step 2: Prepare Your Embroidery
Before you can turn your hand-stitched embroidery into a patch, you need to decide which part of your design you want to use. It could be a specific motif, a word or phrase, or even the entire piece if it’s small enough. Once you’ve made that decision, carefully cut around the chosen section, leaving a small border of fabric around it.
Step 3: Secure the Fabric
Place your chosen section of embroidery into an embroidery hoop. This will help keep the fabric taut and ensure a neat finish. Tighten the hoop to secure the fabric in place.
Step 4: Add a Border
Adding a border to your patch not only gives it a polished look but also helps keep the fabric from fraying. Using a contrasting color of embroidery thread, stitch a border around the edges of your embroidery. You can choose a basic running stitch or experiment with more intricate border designs.
Step 5: Attach the Iron-on Adhesive
Trim the excess fabric around your embroidered patch, leaving a small border of about 1/4 inch. Then, cut a piece of iron-on adhesive slightly smaller than the size of your patch. Place the adhesive on the backside of your fabric, making sure to cover the entire area.
Next, set your iron to the appropriate heat setting for the fabric you’re using and press it firmly over the adhesive for a few seconds. The heat will activate the adhesive, bonding it to the fabric.
Step 6: Apply Your Patch
Now that your patch is ready, it’s time to decide where you want to apply it. Whether it’s a denim jacket, a canvas bag, or a favorite pair of jeans, position your patch on the desired location, adhesive side down. Once you’re satisfied with the placement, cover it with a cloth and iron it for about 15 seconds. Be sure to apply even pressure to ensure a secure bond.
Allow the fabric to cool before gently peeling off the protective backing of the adhesive. Congrats! You’ve successfully turned your hand-stitched embroidery into a stylish patch!
Express Your Creativity with Embroidered Patches
Now that you know how to transform your hand-stitched embroidery into patches, the possibilities are endless. You can create custom patches to add a personal touch to your wardrobe or even make them as unique gifts for your loved ones. Let your creativity run wild!
 Imagine the satisfaction of seeing your own embroidery designs adorning your favorite clothes or accessories. With a little time and effort, you can turn your passion for embroidery into wearable art that will make a statement wherever you go.
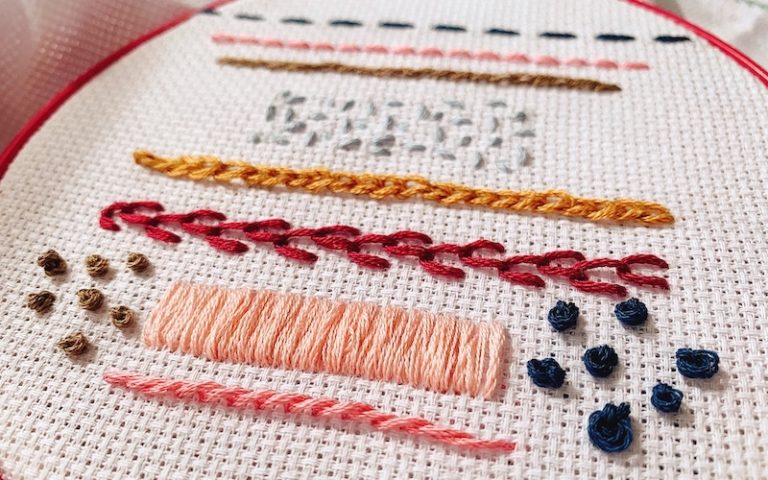
If you’re looking for inspiration, you can find countless ideas and tutorials online. One example is the beautiful embroidered patches showcased in the image below:
 Conclusion
Whether you’re a seasoned embroidery enthusiast or just starting your stitching journey, transforming your hand-stitched embroidery into patches is a fantastic way to showcase your talent and creativity. These patches can turn ordinary garments into unique fashion statements or add a personalized touch to your accessories.
So, gather your materials, select your favorite embroidery designs, and follow the step-by-step process outlined above. With a little practice and effort, you’ll soon have a collection of stunning embroidered patches ready to be displayed with pride!
If you are searching about Chenille & Chainstitch Letter Patches Handmade Custom in 2020 you’ve visit to the right page. We have 5 Pictures about Chenille & Chainstitch Letter Patches Handmade Custom in 2020 like 4 Embroidered Patches | Embroidered patch diy, Embroidery stitches, Chenille & Chainstitch Letter Patches Handmade Custom in 2020 and also Chenille & Chainstitch Letter Patches Handmade Custom in 2020. Here it is:
Chenille & Chainstitch Letter Patches Handmade Custom In 2020
 www.pinterest.comchenille chainstitch worldfamousoriginal
15 Stitches Every Embroiderer Should Know
/15Stitches-587161e53df78c17b6e270e8.jpg) embroidery.about.com4 Embroidered Patches | Embroidered Patch Diy, Embroidery Stitches
embroidery.about.com4 Embroidered Patches | Embroidered Patch Diy, Embroidery Stitches
www.pinterest.comembroidery own ways bee marking significance aspects thesprucecrafts oceanup stitches
How To Turn Hand-Stitched Embroidery Into A Patch In 2020 | Diy Patches
www.pinterest.combrit
9 Basic Embroidery Stitches To Master - Makers Nook
 makersnook.comEmbroidery own ways bee marking significance aspects thesprucecrafts oceanup stitches. 15 stitches every embroiderer should know. 4 embroidered patches